Connections & Pagination
In this section, we’ll see how to handle collections of many items, including paginated lists and infinite scrolling. In Relay, paginated and infinite-scrolled lists are handled using an abstraction known as a Connection.
Relay does a lot of the work for you when handling paginated collections of items. But to do that, it relies on a specific convention for how those collections are modeled in your schema. This convention is powerful and flexible, and comes out of experience building many products with collections of items. Let’s step through the design process for this schema convention so that we can understand why it works this way.
There are three important points to understand:
- Edges themselves have properties — for example, in a list of your friends, the date when you friended that person is a property of the edge between you, rather than of the other person per se. We handle this by creating nodes that represent the edges.
- The list itself has properties, such as whether or not there is a next page available. We handle this with a node that represent the list itself as well as one for the current page.
- Pagination is done by cursors — opaque symbols that point to the next page of results — rather than offsets.
Imagine we want to show a list of the user’s friends. At a high level, we imagine a graph where the viewer and their friends are each nodes. From the viewer to each friend node is an edge, and the edge itself has properties.
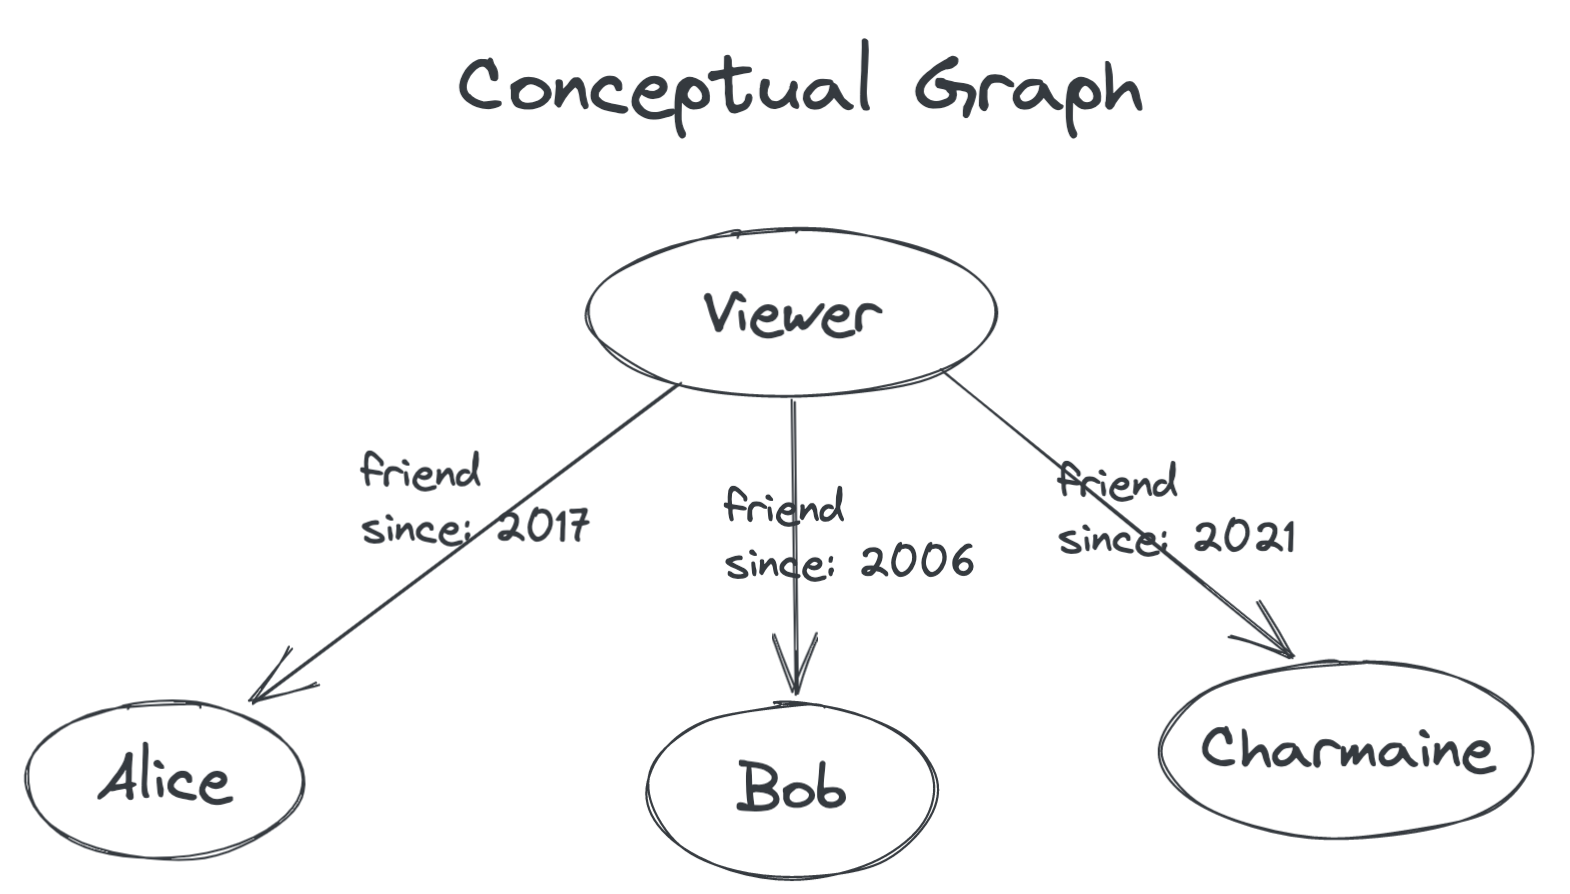
Now let’s try to model this situation using GraphQL.
In GraphQL, only nodes can have properties, not edges. So the first thing we’ll do is represent the conceptual edge from you to your friend with its very own node.
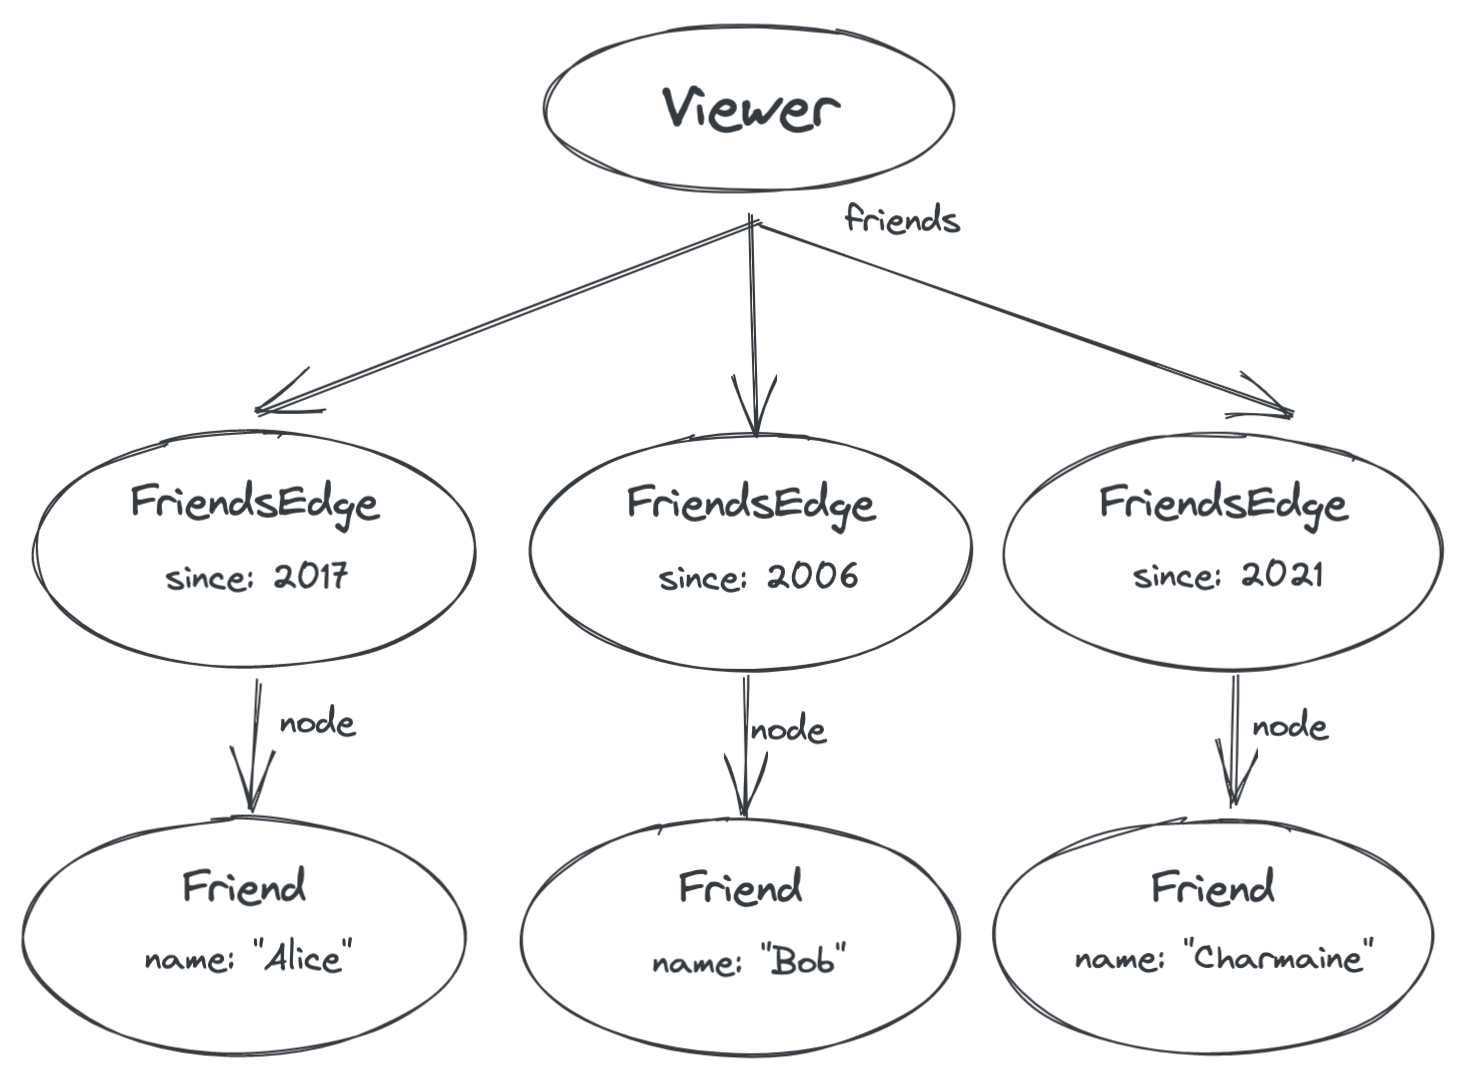
Now the properties of the edge are represented by a new type of node called a “FriendsEdge”.
The GraphQL to query this would like this:
// XXX example only, not final code
fragment FriendsFragment1 on Viewer {
  friends {
    since // a property of the edge
    node {
      name // a property of the friend itself
    }
  }
}
Now we have a good place in the GraphQL schema to put edge-specific information such as the date when the edge was created (that is, the date you friended that person).
Now consider what we would need to model in our schema in order to support pagination and infinite scrolling.
- The client must be able to specify how large of a page it wants.
- The client must be informed as to whether any more pages are available, so that it can enable or disable the ‘next page’ button (or, for infinite scrolling, can stop making further requests).
- The client must be able to ask for the next page after the one it already has.
How can we use the features of GraphQL to do these things? Specifying the page size is done with field arguments. In other words, instead of just friends the query will say friends(first: 3), passing the page size an argument to the friends field.
For the server to say whether there is a next page or not, we need to introduce a node in the graph that has information about the list of friends itself, just like we are introducing a node for each edge to store information about the edge itself. This new node is called a Connection.
The Connection node represents the connection itself between you and your friends. Metadata about the connection is stored there — for example, it could have a totalCount field that says how many friends you have. In addition, it always has two fields which represent the current page: a pageInfo field with metadata about the current page, such as whether there is another page available — and an edges field that points to the edges we saw before:
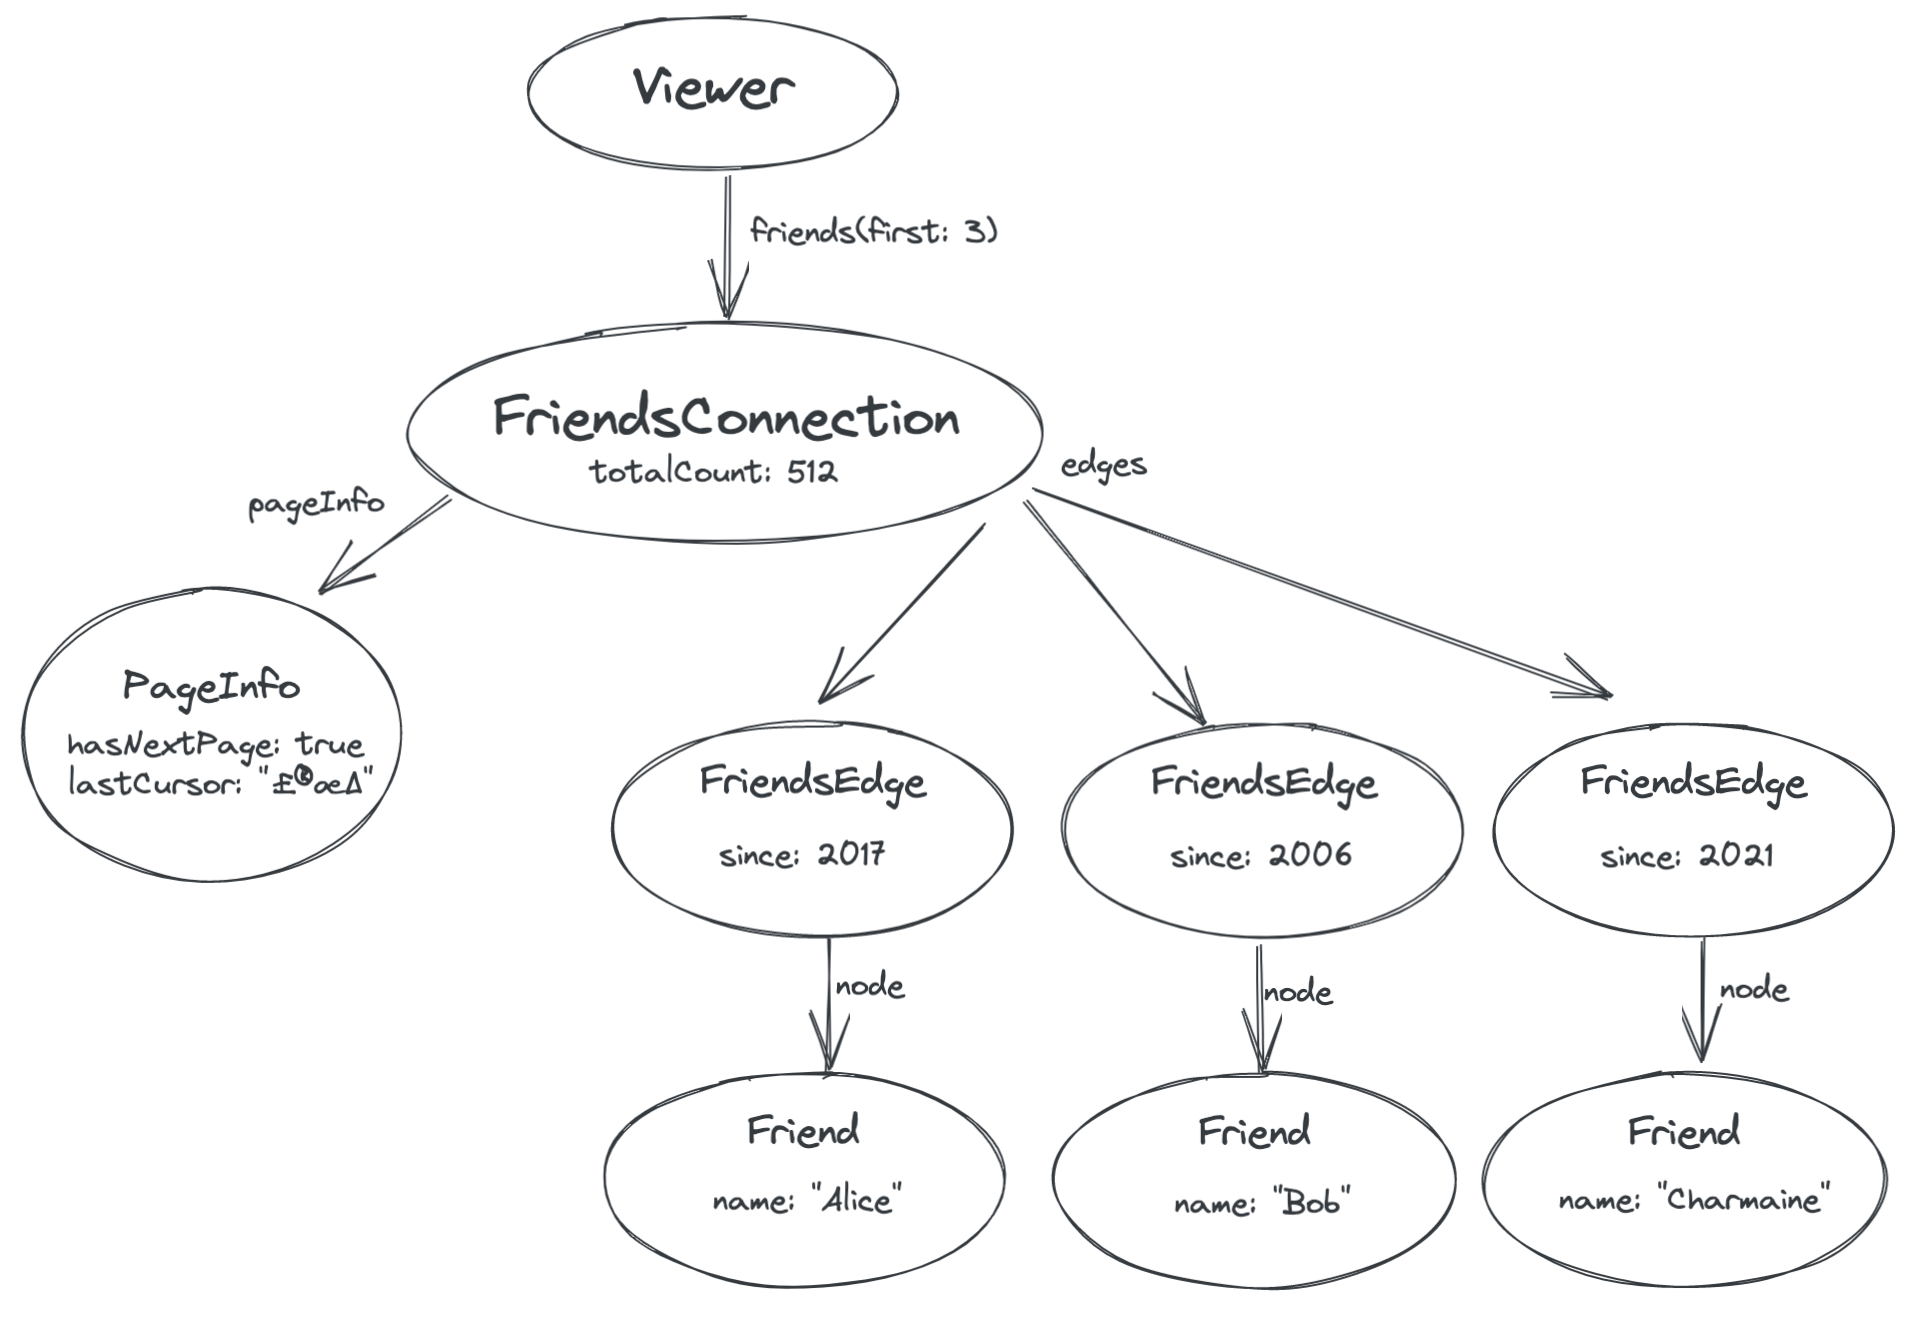
Finally, we need a way to request the next page of results. You’ll notice in the above diagram that the PageInfo node has a field called lastCursor. This is an opaque token provided by the server that represents the position in the list of the last edge that we were given (the friend “Charmaine”). We can then pass this cursor back to the server in order to retrieve the next page.
By passing the lastCursor value back to the server as an argument to the friends field, we can ask the server for friends that are after the ones we’ve already retrieved:
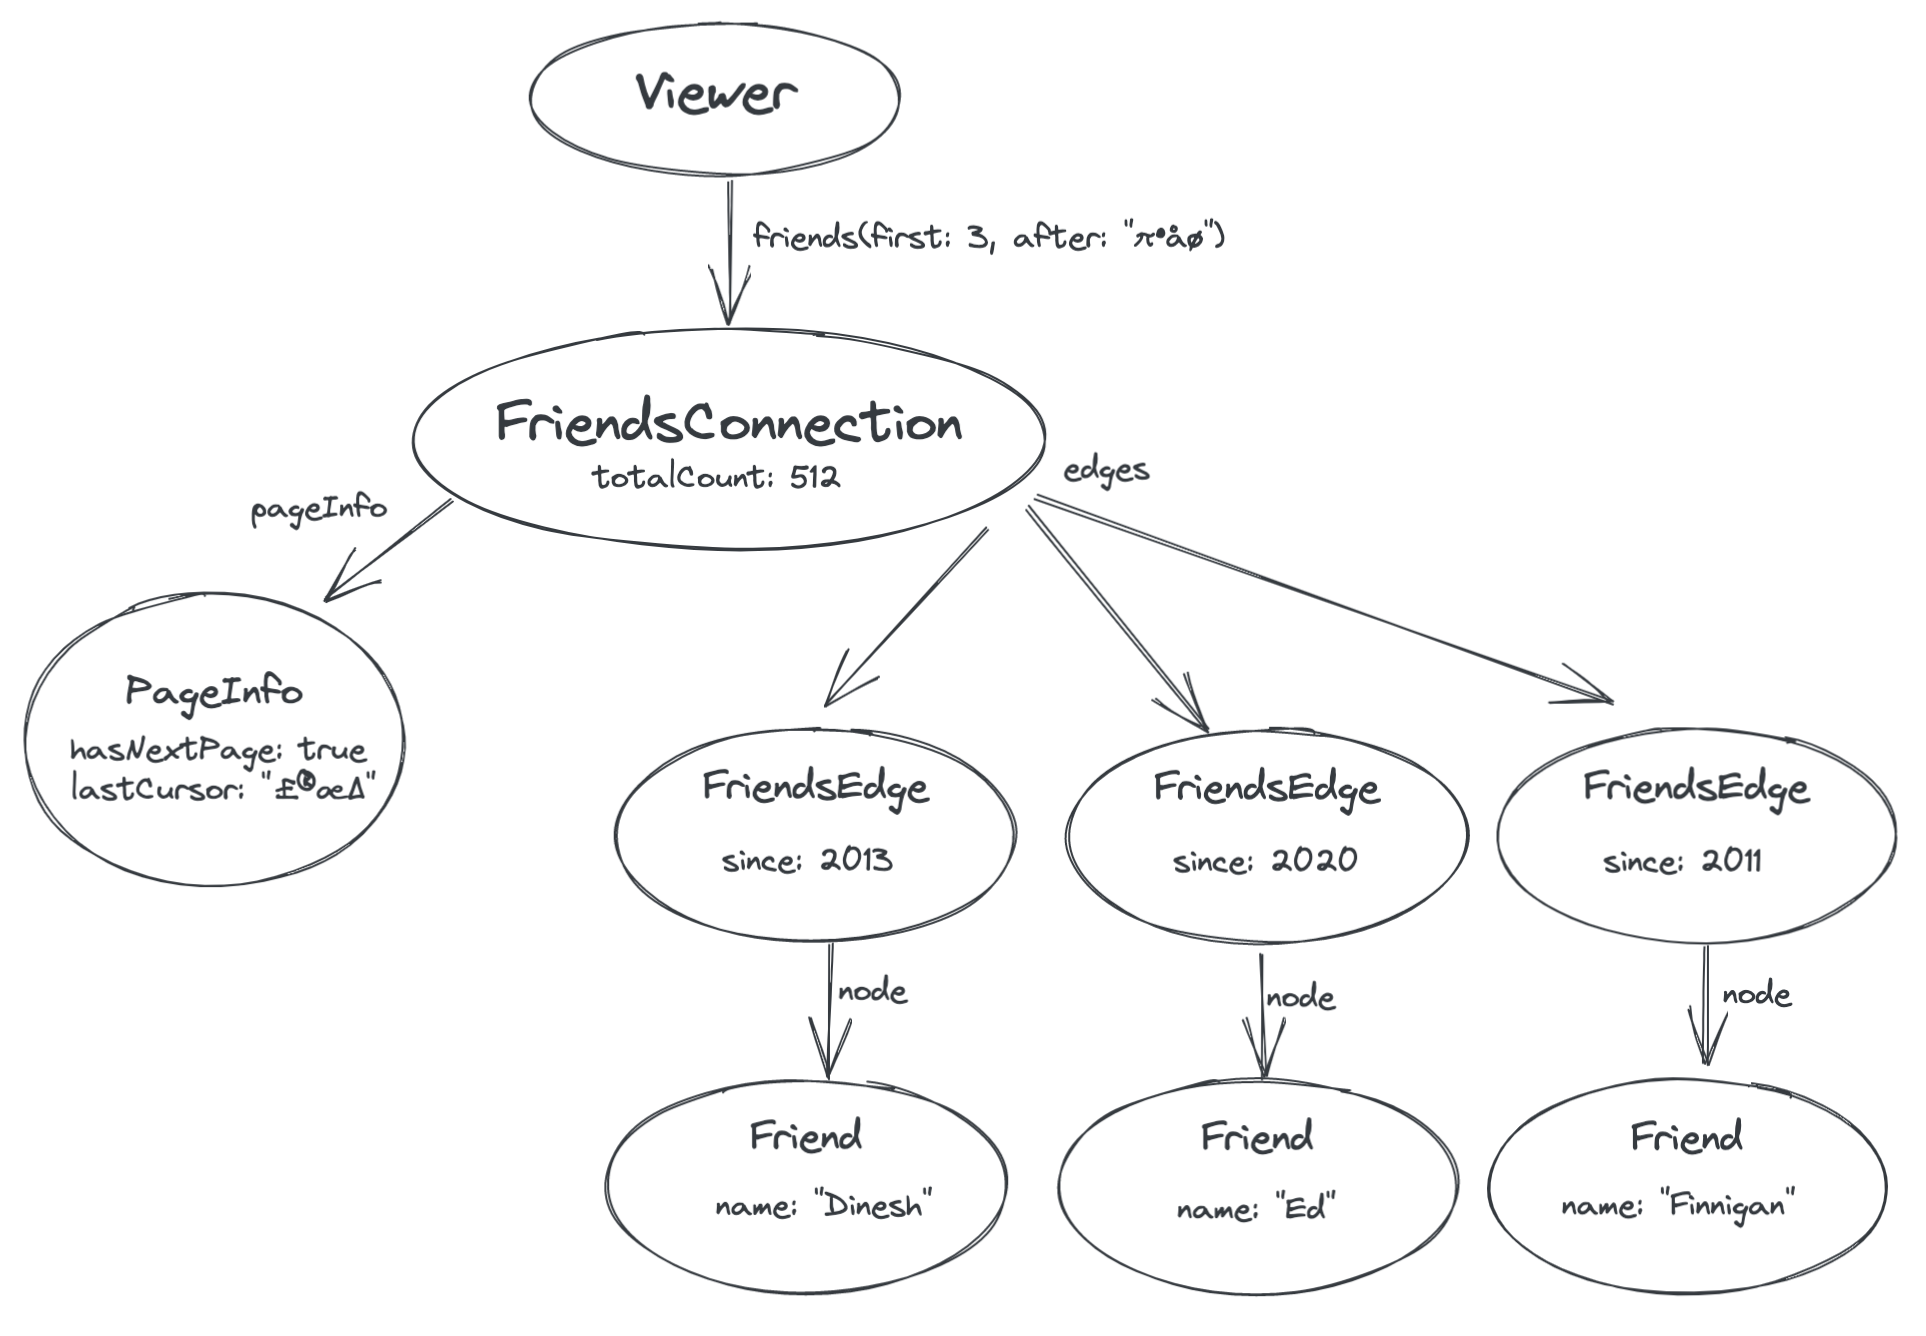
This overall scheme for modeling paginated lists is specified in detail in the GraphQL Cursor Connections Spec. It is flexible for many different applications, and although Relay relies on this convention to handle pagination automatically, designing your schema this way is a good idea whether or not you use Relay.
Now that we've stepped through the underlying model for Connections, let’s turn our attention to actually using it to implement Comments for our Newsfeed stories.
Implementing “Load More Comments”
Take a look once more at the Story component. There’s a StoryCommentsSection component that you can import and add to the bottom of Story:
import StoryCommentsSection from './StoryCommentsSection';

function Story({story}) {
  const data = useFragment(StoryFragment, story);
  return (
    <Card>
      <Heading>{data.title}</Heading>
      <PosterByline person={data.poster} />
      <Timestamp time={data.posted_at} />
      <Image image={data.image} />
      <StorySummary summary={data.summary} />
      <StoryCommentsSection story={data} />
    </Card>
  );
}
And add StoryCommentsSection’s fragment to Story’s fragment:
const StoryFragment = graphql`
  fragment StoryFragment on Story {
    // ... as before
    ...StoryCommentsSectionFragment
  }
`;
At this point, you should see up to three comments on each story. Some stories have more than three comments, and these will show a "Load more" button, although it isn't hooked up yet:

Now go to StoryCommentsSection and take a look:
const StoryCommentsSectionFragment = graphql`
 fragment StoryCommentsSectionFragment on Story {
  comments(first: 3) {
    edges {
      node {
        ...CommentFragment
      }
    }
    pageInfo {
      hasNextPage
    }
  }
 }
`;

function StoryCommentsSection({story}) {
  const data = useFragment(StoryCommentsSectionFragment, story);
  const onLoadMore = () => {/* TODO */};
  return (
    <>
      {data.comments.edges.map(commentEdge =>
        <Comment comment={commentEdge.node} />
      )}
      {data.comments.pageInfo.hasNextPage && (
        <LoadMoreCommentsButton onClick={onLoadMore} />
      )}
    </>
  );
}
Here we see that StoryCommentsSection is selecting the first three comments for each story using the Connection schema convention: the comments field accepts the page size as an argument, and for each comment there is an edge and within that a node containing the actual comment data — we’re spreading in CommentFragment here to retrieve the data needed to show an individual comment with the Comment component. It also uses the pageInfo field of the connection to decide whether to show a “Load More” button.
Our task then is to make the “Load More” button actually load an additional page of comments. Relay handles the gritty details for us, but we do have to supply a few steps to set it up.
Augmenting the Fragment
Before we modify our component, the fragment itself needs three extra pieces of information. First, we need the fragment to accept the page size and cursor as fragment arguments rather than being hard-coded:
const StoryCommentsSectionFragment = graphql`
  fragment StoryCommentsSectionFragment on Story
    @argumentDefinitions(
      cursor: { type: "String" }
      count: { type: "Int", defaultValue: 3 }
    )
  {
    comments(after: $cursor, first: $count) {
      edges {
        node {
          ...CommentFragment
        }
      }
      pageInfo {
        hasNextPage
      }
    }
  }
`;
Next, we need to make the fragment refetchable, so that Relay will be able to fetch it again with new values for the arguments — namely, a new cursor for the $cursor argument:
const StoryCommentsSectionFragment = graphql`
  fragment StoryCommentsSectionFragment on Story
    @refetchable(queryName: "StoryCommentsSectionPaginationQuery")
    @argumentDefinitions(
    ... as before
`;
Now there’s just one more change we need to make to the fragment. Relay needs to know which field within the fragment represents the Connection that we’re going to paginate over. To do that, we mark it with a @connection directive:
const StoryCommentsSectionFragment = graphql`
  fragment StoryCommentsSectionFragment on Story
    @refetchable(queryName: "StoryCommentsSectionPaginationQuery")
    @argumentDefinitions(
      cursor: { type: "String" }
      count: { type: "Int", defaultValue: 3 }
    )
  {
    comments(after: $cursor, first: $count)
      @connection(key: "StoryCommentsSectionFragment_comments")
    {
      edges {
        node {
          ...CommentFragment
        }
      }
      pageInfo {
        hasNextPage
      }
    }
  }
`;
The @connection directive requires a key argument which must be a unique string — here formed from the fragment name and field name. This key is used when editing the connection’s contents during mutations, as we’ll see in the next chapter.
The usePaginationFragment hook
Now that we’ve got the fragment all souped up, we can modify our component to implement the Load More button.
Take these two lines at the top of the StoryCommentsSection component:
const data = useFragment(StoryCommentsSectionFragment, story);
const onLoadMore = () => {/* TODO */};
and replace them with:
const {data, loadNext} = usePaginationFragment(StoryCommentsSectionFragment, story);
const onLoadMore = () => loadNext(3);
Now the Load More button should cause another three comments to be loaded.
Improving the Loading Experience with useTransition
As it stands, there’s no user feedback when you click the “Load More” button until the new comments have finished loading and then appear. Every user action should result in immediate feedback, so let’s show a spinner while the new data is loading — but without hiding the existing UI.
To do that, we need to wrap our call to loadNext inside a React transition. Here’s the change’s we need to make:
function StoryCommentsSection({story}) {
  const [isPending, startTransition] = useTransition();
  const {data, loadNext} = usePaginationFragment(StoryCommentsSectionFragment, story);
  const onLoadMore = () => startTransition(() => {
    loadNext(3);
  });
  return (
    <>
      {data.comments.edges.map(commentEdge =>
        <Comment comment={commentEdge.node} />
      )}
      {data.comments.pageInfo.hasNextPage && (
        <LoadMoreCommentsButton
          onClick={onLoadMore}
          disabled={isPending}
        />
      )}
      {isPending && <CommentsLoadingSpinner />}
    </>
  );
}
Every user action with results that aren’t immediate should be wrapped in a React transition. This allows React to prioritize different updates: for example, if when the data becomes available and React is rendering the new comments, the user clicks on another tab to navigate to a different page, React can interrupt rendering the comments in order to render the new page that the user wanted.
Infinite Scrolling Newsfeed Stories
Let’s use what we’ve learned about pagination to create an infinite scrolling newsfeed. The Newsfeed will be pretty much the same as loading more comments, except that loadNext will be triggered automatically when the user scrolls to the bottom of the page, instead of by pressing a button.
Step 1 — Select the Connection Field in the Query
Right now our app uses the topStories root field to fetch a simple array of the top 3 stories. The schema also provides a newsfeedStories field on Viewer which is a Connection. Let’s modify the Newsfeed component to use this new field. Take a look once more at Newsfeed.tsx — the GraphQL query at the top should look like this:
const NewsfeedQuery = graphql`
  query NewsfeedQuery {
    topStories {
      id
      ...StoryFragment
    }
  }
`;
Go ahead and replace it with this:
const NewsfeedQuery = graphql`
  query NewsfeedQuery {
    viewer {
      newsfeedStories(first: 3) {
        edges {
          node {
            id
            ...StoryFragment
          }
        }
      }
    }
  }
`;
Here we’ve replaced topStories with viewer’s newsfeedStories, adding a first argument so that we fetch the first 3 stories initially. Within that we’ve selected the edge and then the node, which is a Story node so we can spread the same StoryFragment from before. We also select id so that we can use it as a React key attribute.
Although we put the topStory and topStories fields at the top level of Query for simplicity, it’s conventional to put fields related to the person who’s looking at the page or app under a field called viewer. We’ll switch to that convention now that we’re using the field as it would be in a real app.
Step 2 — Map over the Edges of the Connection
We need to modify the Newsfeed component to map over the edges and render each node:
function Newsfeed() {
  const data = useLazyLoadQuery(NewsfeedFragment, {});
  const storyEdges = data.newsfeedStories.edges;
  return (
    <>
      {storyEdges.map(storyEdge =>
        <Story key={storyEdge.node.id} story={storyEdge.node} />
      )}
    </>
  );
}
Step 3 — Lower Newsfeed into a Fragment
Relay’s pagination features only work with fragments, not entire queries. This is because, although we’re directly issuing a query in this component in this simple example app, in real applications the query is generally issued at some high-level routing component, which would rarely be the same component that’s showing a paginated list.
To get this to work, we just need to separate out the contents NewsfeedQuery into a fragment, which we’ll call NewsfeedContentsFragment:
const NewsfeedQuery = graphql`
  query NewsfeedQuery {
    ...NewsfeedContentsFragment
  }
`;

const NewsfeedContentsFragment = graphql`
  fragment NewsfeedContentsFragment on Query {
    viewer {
      newsfeedStories {
        edges {
          node {
            id
            ...StoryFragment
          }
        }
      }
    }
  }
`;
This is a good time to mention that every GraphQL schema contains a type called Query that represents the top-level fields available to queries. By defining a fragment on Query, we can spread it directly into the top level.
Within Newsfeed, we can call both useLazyLoadQuery and useFragment, though in real life these would generally be in different components:
export default function Newsfeed() {
  const queryData = useLazyLoadQuery(NewsfeedFragment, {});
  const data = useFragment(NewsfeedContentsFragment, queryData);
  const storyEdges = data.newsfeedStories.edges;
  ...
}
Step 4 — Augment the Fragment for Pagination
Now that we’re using a Connection field for the stories and have ourselves a fragment, we can make the changes to the fragment that we need in order to support pagination. These are the same as in the last example. We need to:
- Add fragment arguments for the page size and cursor (
firstandafter). - Pass those arguments in to the
newsfeedStoriesfield as field arguments. - Mark the fragment as
@refetchable. - Mark the
newsfeedStoriesfield with@connection.
You should end up with something like this:
const NewsfeedContentsFragment = graphql`
  fragment NewsfeedContentsFragment on Query
    @argumentDefinitions (
      cursor: { type: "String" }
      count: { type: "Int", defaultValue: 3 }
    )
    @refetchable(queryName: "NewsfeedContentsRefetchQuery")
  {
    viewer {
      newsfeedStories(after: $cursor, first: $count)
        @connection(key: "NewsfeedContentsFragment_newsfeedStories")
      {
        edges {
          node {
            id
            ...StoryFragment
          }
        }
      }
    }
  }
`;
Step 5 — Call usePaginationFragment
Now we need to modify the NewsfeedContents component to call usePaginationFragment:
function NewsfeedContents({viewer}) {
  const {data, loadNext} = usePaginationFragment(NewsfeedFragment, viewer);
  const storyEdges = data.newsfeedStories.edges;
  return (
    <>
      {storyEdges.map(storyEdge =>
        <Story key={storyEdge.node.id} story={storyEdge.node} />
      )}
    </>
  );
}
Step 6 — Paginate with a Scroll Trigger
We’ve prepared a component called InfiniteScrollTrigger that detects when the bottom of the page is reached — we can use this to call loadNext at the appropriate time. It needs to know whether more pages exist and whether we’re currently loading the next page — we can retrieve these from the return value of usePaginationFragment:
function NewsfeedContents({query}) {
  const {
    data,
    loadNext,
    hasNext,
    isLoadingNext,
  } = usePaginationFragment(NewsfeedContentsFragment, query);
  function onEndReached() {
    loadNext(3);
  }
  const storyEdges = data.viewer.newsfeedStories.edges;
  return (
    <>
      {storyEdges.map(storyEdge =>
        <Story key={storyEdge.node.id} story={storyEdge.node} />
      )}
      <InfiniteScrollTrigger
        onEndReached={onEndReached}
        hasNext={hasNext}
        isLoadingNext={isLoadingNext}
      />
    </>
  );
}
We should now be able to scroll to the bottom of the page and see more stories loading. Feels like a real newsfeed app!
Summary
- Connections are a schema convention that Relay relies on to model the behavior of paginatable lists.
- It's generally a good idea to use Connections in your schema rather than simple lists. This gives you the flexibility to paginate if you need to.
Next, we'll finally look at how to update data on the server. Connections will play a role in that as well, as we'll see how to append a newly-created node to an existing Connection.